Removing Rv Bunk Beds : Ultimate Space-Saving Solution
To remove RV bunk beds, start by detaching the screws and bolts securing the bed frame together. Lift and slide out the individual bunk bed pieces carefully.
Repurpose the space for storage or additional seating options after removal. Making this change can enhance the functionality and comfort of your RV. By following these steps, you can easily transform the interior layout to better suit your needs and preferences.
Upgrading your RV living space can make your travel experiences more enjoyable and practical.

Credit: expandfurniture.com

Why Remove Rv Bunk Beds
Preparing for removal, step-by-step removal guide, alternative storage and sleeping solutions, making the most of the space, safety considerations, assessing the value of removing rv bunk beds, frequently asked questions for removing rv bunk beds.
Without a doubt, removing RV bunk beds can substantially enhance the functionality and comfort of your RV living space. Getting rid of bunk beds opens up possibilities for creating a more versatile and personalized interior layout. It allows for customization to better suit your specific needs and preferences, ultimately improving the overall RV experience.
Lack Of Usage
RV bunk beds might go unused for extended periods because not needed by occupants.
Safety Concerns
Safety hazards such as fall risks involve with RV bunk beds occupancy.
Need For More Space
Occasional travelers may require extra space for storage or comfort needs.
Preparing for removal of RV bunk beds requires careful planning and coordination. It involves disassembling the beds, securing loose parts, and ensuring proper storage to optimize space during the removal process.
Clearing The Area
Before starting, clear the space around the bunk bed area.
Gathering Tools And Supplies
Get tools like screwdrivers, pliers, and a tape measure ready.
Measuring And Assessing
Measure the bunk bed dimensions and assess access points.
When removing RV bunk beds, follow this step-by-step removal guide to ensure a smooth process. Begin by clearing the area around the bunk beds and disconnecting any electrical and plumbing connections. Then, dismantle the bed frame and remove it from the RV.
Finally, clean and organize the space to complete the removal process.
Step 1: Removing Mattresses And Bedding
To begin the process of removing RV bunk beds, you’ll need to start by taking off the mattresses and bedding. Remove all pillows, sheets, and blankets from the bunk bed. It’s a good idea to place them in separate bags or bins to keep them organized and reduce the risk of misplacing any accessories.
Step 2: Disconnecting Bed Frame
Next, you’ll want to disconnect the bed frame from the fixed structure of the RV. Carefully unscrew the bolts or screws that attach the bed frame to the RV’s interior wall or floor. Make sure to keep track of these fasteners as they will be needed when reinstalling the bunk bed or for any future modifications.
Step 3: Unbolting And Detaching Support Brackets
Now it’s time to remove the support brackets that hold the bunk bed in place. Locate the brackets at the corners of the bed frame and use a wrench or screwdriver to unbolt them. Be sure to loosen all the bolts before completely detaching the brackets. Once the brackets are removed, set them aside in a safe place.
Step 4: Taking Apart Ladder Or Guard Rails
The final step is taking apart the ladder or guard rails. If your RV bunk bed has a ladder or guard rails, unscrew any fasteners that secure them to the bed frame. Carefully remove the ladder or guard rails without causing any damage to the RV’s interior. Keep all the screws or bolts in a separate container to avoid misplacing them.
By following this step-by-step removal guide, you can easily dismantle your RV bunk beds. Remember to keep all the necessary hardware in a safe place for future use. Removing the mattresses and bedding, disconnecting the bed frame, unbolting and detaching support brackets, and taking apart the ladder or guard rails will allow you to free up space in your RV and customize the area to better suit your needs.
When it comes to removing RV bunk beds, you may find yourself in need of alternative storage and sleeping solutions. Fortunately, there are several options available to optimize space and ensure comfort in your RV. Let’s explore some of the top alternatives below.
Folding Beds
Folding beds are a versatile option, as they can be easily stored away when not in use, allowing for more space during the day. These beds typically come in various sizes and styles, providing flexibility to accommodate different needs.
Sofa beds serve a dual purpose, functioning as comfortable seating during the day and transforming into a bed when needed. This option is ideal for saving space while offering a convenient sleeping solution for guests.
Murphy Beds
Murphy beds, also known as wall beds, are designed to fold up against the wall when not in use, freeing up valuable floor space. These beds are a popular choice for RVs, as they offer seamless integration with the existing interior design.
Under Bed Storage
Utilizing under bed storage is a practical way to maximize space in the RV. By incorporating built-in drawers or containers, you can efficiently store belongings while keeping the living area clutter-free.
When it comes to RV living, space is a precious commodity. Removing the bunk beds in your RV presents an opportunity to maximize the available space to make your travels more comfortable and functional.
Organizing Tips
Utilize vertical storage solutions to keep items off the floor and create a sense of space inside the RV. Use hanging organizers for shoes, accessories, and small items to free up space in closets and drawers.
Multi-functional Furniture
Invest in multi-functional furniture pieces such as sofa beds or folding tables to optimize the space. Look for pieces that can serve dual purposes to maximize functionality without sacrificing comfort.
Utilizing Vertical Space
Consider installing overhead shelving or cabinets to free up floor space and keep essential items organized. Maximize vertical space with the use of shelves and hooks to hang items like kitchen utensils and towels.

Credit: www.amazon.com
Safety considerations are crucial when removing RV bunk beds. Properly securing loose components and ensuring stable footing are essential. Adhering to weight limits and using appropriate tools can prevent accidents during the removal process.
When it comes to removing RV bunk beds, safety should always be the top priority. By taking a few simple precautions, you can ensure a smooth and secure process. Below, we discuss some safety considerations that you should keep in mind when removing RV bunk beds.
Securing Loose Items
Before you begin removing the bunk beds, it is important to secure any loose items in the RV. This will prevent them from falling or causing any accidents during the process. Make sure to store any loose objects such as toys, electronics, or kitchenware in cabinets or secure them with straps to prevent them from shifting or falling while you work.
Proper Weight Distribution
Another crucial safety consideration is maintaining proper weight distribution in your RV. Removing bunk beds can affect the overall balance and stability of the vehicle, especially if they were originally designed as structural components. You must consider how the removal will impact the weight distribution and make the necessary adjustments to ensure that the RV remains balanced.
Here are a few key points to keep in mind:
- Consult your RV’s manufacturer or a professional for guidance on weight distribution adjustments.
- Rebalance the weight by redistributing items inside the RV after the bunk beds are removed.
- Consider adding counterweights or adjustable suspension components if necessary.
Ensuring Adequate Seating And Sleeping Areas
The removal of bunk beds may reduce the available seating and sleeping areas in your RV. It is crucial to ensure that you still have adequate space for both activities to ensure comfort and safety for everyone onboard. Here are a few tips to follow:
- Consider replacing the removed bunk bed with an alternative seating or sleeping arrangement that suits your needs, such as a sofa bed or dinette.
- Measure the dimensions of the removed bunk bed and select furniture that fits properly in the available space.
- Ensure that the replacement furniture is securely installed and meets all safety standards.
By following these safety considerations, you can confidently remove RV bunk beds while ensuring the safety and comfort of everyone onboard. Always prioritize safety before making any modifications to your RV, and consider consulting with a professional if needed to guarantee a successful and secure removal process.
When considering the removal of RV bunk beds, it’s crucial to evaluate potential benefits such as increased living space, enhanced comfort and functionality, and potential resale value.
Removing RV bunk beds opens up more room inside the vehicle, creating a spacious and versatile living area.
Enhanced Comfort And Functionality
Without bunk beds, RV occupants can enjoy a more comfortable sleeping arrangement and improved functionality for various activities.
Possible Resale Value
The removal of bunk beds can potentially increase the resale value of the RV by appealing to a wider range of buyers seeking customized living spaces.

Credit: adventurewagon.com
What Are The Benefits Of Removing Rv Bunk Beds?
Removing RV bunk beds can provide more space for activities and storage, improve the overall aesthetics of the RV interior, and allow for customization and personalization of the living space.
How Can I Safely Remove Rv Bunk Beds?
To safely remove RV bunk beds, start by securing any loose items, disconnecting any electrical components, and then carefully disassembling the bunk bed frame while ensuring proper support and balance to avoid any accidents.
What Tools Are Needed To Remove Rv Bunk Beds?
To remove RV bunk beds, you’ll need basic tools like a screwdriver, wrench, pliers, and a power drill. Additionally, having a socket set, a level, and a stud finder can also be beneficial for a smoother and more efficient removal process.
Can I Re-purpose The Space After Removing Rv Bunk Beds?
Yes, after removing RV bunk beds, you can repurpose the space for various uses such as installing a desk, creating a cozy reading nook, or incorporating additional storage solutions to optimize the functionality of the area.
Removing RV bunk beds can be a practical and space-saving solution for recreational vehicle owners. With a few simple steps and tools, you can create more room for storage or customize your RV to better suit your needs. Whether you’re looking to repurpose the space or add a different sleeping arrangement, the process is straightforward and can be completed with ease.
By following the tips mentioned in this blog post, you can confidently remove RV bunk beds and enjoy a more flexible and functional living space in your RV.
Related Post
Hwy 82 New Mexico Road Conditions
Air Parking Brake Valve Diagram
Buying A Duramax With 250k Miles
Rv Fender Skirt Repair
How To Level A Camper Without Moving It
Removing RV Bunk Beds – Full Guide
Quick Navigation
Most recreational vehicles you will find in the market are bunk models, and their demand is much higher.
In most designs, you’ll find bunk beds across the rear of the trailer. Bunkhouse RV models have their bunk beds set up in a room right beside the bathroom or kitchen.

In some campers, bunk beds are incorporated into the body design to help maintain structural integrity or squareness.
In addition, the bunks help keep the weight balance for some RVs.
Types of RVs that you are likely to find bunk beds:
- Passport Ultra Lite 290BH
- Passport Ultralite 28bh
- Imagine 2400BH
- Imagine XLS 21BHE
- Imagine XLS 23BHE
- Arctic Fox 275B fifth wheel
- Winnebago Micro Minnie
- 1995 T2670 – Sunline Solaris
- Jayco Jay Feather X213
- North Trail NT 24BHS
Space is of the essence in an RV, especially when you have plenty of stuff you do not wish to leave behind.
Unfortunately, creating extra space in a trailer means something will have to go. And in most cases, removing RV bunk beds is the most common solution.
You do not have to get a new camper when you can remove the bunk beds in your bunkhouse RV.
As much as this decision may change the RV’s resale value or weaken the engineered wall structure, it is worth trying.
Here is a complete guide that you can use whenever you are thinking of removing your RV bunk beds:
Removing RV Bunk Beds
Understanding the scope.
Before removing RV bunk beds, you need to determine whether they are part and parcel of the body structure.
This first check will prevent you from damaging and ruining things as you unscrew various parts of the bunk.
Also, you will need to determine how the bunk bedside supports and the cross members are attached to the wall.
Usually, the RV bunk beds are fixed directly to the side walls with one side to the bathroom or kitchen wall.
Removing RV bunk beds without damaging or compromising the walls requires that you have the following tools:
- A screwdriver – star, square
- A hammer or mallet
- A Prying tool – flathead screwdriver and long crowbar
- A hammer and a chisel (optional)
- An oscillating tool with a carbide blade (optional)
- A joint knife
- Safety gear (Safety Goggles and half-mask respirator)
The tip of the screwdriver will depend on the nature of the screw. You are likely to find that most installations in RVs use star-headed screws.
You must use the right tools for the bolts or screws in your bunk bed model.
The Process
Before you embark on removing RV bunk beds, you need to consult the paperwork or detailed construction drawings about them.
You may also need to put painter’s tape around the perimeter as a preventive measure against scuffing up the wall.
In addition, some bunks have water pipes and electrical wires that run through them.
Therefore, you may need to disconnect your battery beforehand so that you do not short the wires and blow a fuse.
Exposing The Inside Structures
First, remove the mattress pads and beddings on your bunk bed. Next, make sure that what you can see are only the wooden or metallic structures that are now exposed.

Separating The Top And Bottom Bunks
The second step is to separate the top bunk from the bottom bunk. You can do this by carefully unscrewing the bolts that hold the two parts together – if there are any.
If your bed bunks come with a ladder and safety side rails, these are the first things to go.
If the bunks are independent, the next step will be to remove the paneling sheets at the top and bottom of the bunks to expose the framework (2×2 or 1×1).
Exposing The Screws And Bed Frames
The third step will be taking off the plywood lying on the top and base of the upper and lower bunks to expose the frame.
Finally, prying up the top board allows you to check whether wires run through the structures.
Depending on the design of the bunk bed, the plywood may be screwed or glued to the framework.
Removing RV bunk beds starts with the top bunk, which is the most difficult to remove.
So, you will need to remove the thin luan plywood to expose the supports, 2×2 frames, and trim screws.
Removing Screws And Bolts
The next step will be locating the screws. You’ll find several screws underneath the bunks along the joints linked with the sidewalls.
Again, you can use a screwdriver to back out the screws or bolts.
As for hidden screws, you can use an oscillating tool with a carbide blade to cut right through them and avoid the risk of damaging the walls or anything around them.
The top and bottom bunk bed frames link to the walls from the outside.
You may only be able to get the screws out from the inside where the frame backs up to the kitchen or bathroom wall.
The most challenging part will be dealing with the outside screws and ripping off the wallboard. You may need extra hands to remove the bunk beds from the walls.
Removing Any Additional Bed Support
After removing all screws, bolts, or slides holding the bunk beds in place, you can now remove any under pieces that you might come across between the bed and the wall to expose more screws.
The braces used to secure the screws to the framework are likely to be aluminum material .
Finishing And Sealing Off Any Damages
You may choose to leave the boards on the walls in case you are looking to install some shelves on any wooden structure on them.
Others may decide to leave the support rails fastened to the walls so that they do not mess with the trailer’s appearance and structural integrity.
The only damages you are likely to get on the walls are scratches and screw holes.
To rectify that, you can apply some filler or wall putty and see your walls ain back their beauty.
Another option will be to use wallpaper trim or borders to cover the holes on the surface of the walls.
But, again, if you wish to resell or re-use the bunk beds, the process should be smooth and with minimal damage.
Removing RV bunk beds can take at least 15 minutes if you have the right tools and someone to help you.
Some bunks are well secured to the walls of the trailer with long staples, which are not too difficult to remove.
If you are careful, you can safely remove your RV bunk beds without damage. This complete guide should be helpful in your upcoming project.
Removing RV bunk beds is a gamble if you have no idea whether removing the bunk beds will affect the stiffness of the camper.
The most important thing to consider is maintaining the recommended weight when converting the new space.
Lowering the tongue weight can upset the towing stability.
In case your bunk beds are permanently mounted, you may need to visit your dealer’s shop for some professional help.

Patrick started his love affair with cars in his childhood. Over the years, he claims a sturdy hold on his driving skills, along with a thorough understanding of cars. We can expect some interesting, holistic, and pleasurable blogs with his flair for writing and his love for cars.
Being a car enthusiast, Patrick has experience comprising of two decades in which he has ridden some of the meanest and strongest machines in the automotive industry. His previous avatars include an automotive professional, photographer, and journalist, and you will certainly experience the roundness of experience in his piece on this site.
In his second decade of reviewing cars and analyzing tools, Patrick is all set to give you convincing, reliable, and the latest information regarding what’s happening in the automotive industry. Currently, he owns a BMW Z3 but cannot get his eyes off Aston Martin DB5. He is a car enthusiast; he loves cooking and listening to music, especially jazz. Here are some of the pieces written by our ace author.
Related Posts:

5 Best RV Bunk Bed Conversion Ideas

Sharing is caring!
Thanks for your support! If you make a purchase using our links in this article, we may make a commission. And, as an Amazon Associate, I earn from qualifying purchases. See the full disclosure here .
We’ve all heard of RVers retrofitting their coaches with bunk beds, but have you ever considered an RV bunk bed conversion in reverse?
Fortunately, there are many amazing ways to repurpose a bunk area. When you no longer need the extra sleeping space, RV bunk bed conversions are a great way to customize your rig.
Maybe you’re an empty nester whose children have moved on to their own adult lives. Or perhaps you work from the road and desperately need office space. Depending on your family’s needs, bunk beds may not be the best use of space.
If your two-legged children have left home, you may want to convert the bunk space into a pet-friendly haven for your four-legged travel companions.
Or perhaps, you’re the opposite of empty nesters, and your children are still very little. We have some great ideas for how you can convert that RV bunk space into a crib that’s safe for your baby or toddler.
If you love your travel trailer or motorhome but want to make better use of your limited square footage, an RV bunk bed conversion might be for you. We’ll show you some great ideas on what else you can do with that space.
Why RV Bunk Bed Conversions Make Sense

As my dad always says, “It’s your house, you have to live in it.” That same advice can be applied to RVs as well. If you spend a lot of time in your RV, then customizing it to meet your specific needs only makes sense. Converting an unused RV bunk bed area is one of the most impactful ways to do just that.
Bunk beds are a popular feature, in part because that space is adaptable as your family grows and changes. Many bunk spaces already have hanger rods and/or fold-up top bunk features for this exact reason.
Sometimes an RV bunk bed to closet or storage conversion is as simple as taking advantage of features already installed in that space. Even if your desired remodel requires removing the bunks entirely, converting this space can still make a lot of sense.
Removing bunks is a relatively uncomplicated DIY project with a lot of bang for your buck. Performing an RV bunk bed conversion into a space you can use is a great way to enhance your RV lifestyle.
How To Remove RV Bunk Beds

Of course, the first step in the RV bunk bed conversion process is to remove the bunks themselves. But how? This construction project can be daunting but don’t be intimidated. In many cases, removing the bunks is a relatively straightforward process.
The first step is to consult your owner’s manual. It should help you determine if there are any wires or plumbing concealed beneath the bunks. If there are, you should disconnect your battery and unplug your camper as a safety precaution. You do not want to risk shorting wires during the demo.
The presence of wires or pipes may also impact your design plan. Rather than hire an electrician or plumber to reroute those utilities, you may opt to hide these fixtures within a cabinet or beneath a raised floor.
Fortunately for novice DIYers, most bunks are not permanently anchored to the frame. But resist the urge to channel your inner Chip Gains or Gallagher and take a sledgehammer to that unwanted fixture.
RVs are built more delicately and, therefore, require a systematic approach. In most cases, disassembly is as easy as removing a few screws and staples.
You’ll need some combination of the following tools:
- Safety gear (goggles, dust mask, etc.)
- Screwdriver or drill
- A mallet or hammer
- A prying tool (crowbar or hardware staple remover)
- An oscillating cutting tool with a carbide blade (not always necessary)
Before you dive in, you’ll want to protect the surrounding area with drop clothes and painter’s tape.
Begin by removing the bedding and mattresses. Once the mattresses are out of the way, look for any bolts connecting the top and bottom bunk. You’ll want to remove these before anything else.
If you have a ladder and/or safety rail, disassemble those using a screwdriver or electric screwdriver. Next, gently pry off the paneling sheet on the top and bottom of the bunk frame. This should expose the plywood base of the bunks.
Find and remove the screws holding the plywood in place and carefully lift the wooden platform out. Depending on your design plan, you may want to leave the structure of the bottom bunk intact. In this case, only remove the plywood on the upper bunk.
The 2 x 2 frame of the bunk should now be visible. Examine the frame to determine how it’s anchored to the wall and remove the screws holding it in place. You may need to cut any hidden screws with your oscillating saw. Consider leaving a portion of the wood frame affixed to the wall to anchor any new furniture you plan to install.
Clear out all of the demoed debris and inspect the walls for screw holes and scratches. You’ll want to apply wall putty, wallpaper, or paneling to give the area a finished look.
Check out this short 2:30 minute video showing how easy it is toremove bunks!
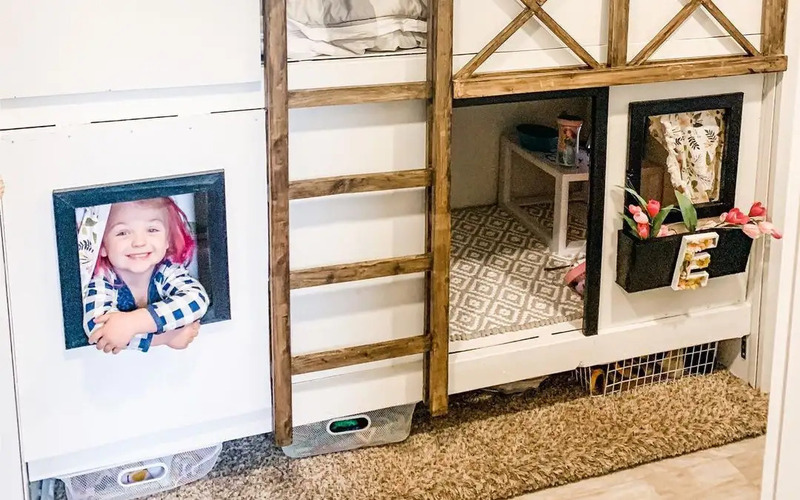
5 RV Bunk Bed Conversion Ideas
1. rv bunk bed to pet bed conversion.

If you have a four-legged travel companion, a great RV bunk conversion idea is to transform the bottom bunk into a pet sanctuary. For larger dogs, this space is usually the right size for their bed. If you have a smaller furry friend, you might be able to fit all of their gear in this spot.
You may need to lower the bunk a bit for smaller, or older pets. Otherwise, consider adding bedside stairs to make it easier to access. When making your RV dog or cat friendly , don’t forget about the potential for storage underneath the bottom bunk. This can be a great place to install a drawer for food dishes, or leash and toy organization.
If you have a pet who can’t quite be trusted to roam free while you’re away, you can enclose the bottom bunk to create a true kennel space for Fido. Whether you use a tension-based baby gate or install a more substantial wall-anchored metal pet door, it’s relatively simple to cordon off this space.
2. Converting RV Bunk Beds To Storage

One of the most straightforward, easily reversible, RV bunk bed conversion ideas is repurposing that space for storage. Often motorhome bunk spaces already have rods for hanging clothes built right in. Proper bunkhouses, more commonly found in towables, have even more room for storage.
When transforming a bunk area into a storage room, consider whether or not you’d like to still be able to use the bunks as beds on occasion. There are tons of totes and collapsible bins that can be set on the bunks and used as pseudo drawers. You can simply remove these containers when you have an overnight guest.
Another option is to remove one or all of the bunks completely. This will allow you to transform the space into customized storage. Some RVers have built walk-in closets or pantries.
If you use video or other specialized equipment, you may find it helpful to create a storage space tailor-made for your industry-specific gear.
3. Changing A Bunkhouse To An Office

Perhaps the most popular RV bunk bed conversion idea is to transform that space into an office. With the increase in people working or attending school remotely, the demand for desk space within an RV has never been greater. While some RVs include office space, others have to be retrofitted with desks, chairs, computers, and the like.
A bunkhouse offers an entire room you can dedicate to remote working. There is often enough space for multiple desks and any auxiliary equipment you might need. Some RVers have even opted to leave one set of bunks and convert the other set to an office area. This creates an office-by-day/bedroom-by-night multipurpose space.
What if the idea of an onboard office intrigues you, but you don’t have a whole bunkroom to work with? Never fear, there are plenty of ways you can create a cozy workstation in place of a single bank of bunk beds. You’ll probably want to start by removing all or part of the bunk frame. Then install a small desk, chair, and divider. Once it’s all in place, you’re good to go!
Retirees may also appreciate a desk area. Even if they aren’t working from the road, an office space doubles as a great hobby room or a good place to sit and video chat with the family.
4. Create A Camper With 2 Master Bedrooms

Another, less thought-of, RV bunk bed conversion option is to reimagine the space as a second master bedroom. Bunks are best suited for kids. Whether you plan to travel with your parents, adult child, or friends, converting that space to one large bed rather than multiple smaller beds sometimes just makes more sense.
This design option works especially well if you have a separate bathroom near the bunkroom. Then everyone can truly have their own space. If you’re a snowbird who leaves family behind during the cooler months, creating a proper guest room might even encourage more visitors.
RV bunk bed conversions are not just for empty nesters. Reconfiguring the bunk room is sometimes the best option, even with young children. Many bunkhouses have four beds, while the average American family has less than three children.
If you have fewer children than beds, you can use that extra space for anything from school desks to toy storage. Opt for a room divider and viola, now you have a three-bedroom camper .
5. How to Convert an RV Bunk Bed into a Crib

While we’re on the topic of converting RV bunk bed areas into more custom bedroom spaces, let’s take a look at how you could also repurpose bunks into a nursery.
The easiest option is to simply install a crib rail across one of the bunks. A tension-based baby gate or a railing anchored directly to the wall both work well. We prefer to anchor the crib rail to ensure it stays firmly in place even when our daredevil toddler does not want it to.
Transforming a bunk to a crib allows you to avoid using valuable floor space for a pack-and-play. This option is also great because it can grow with your child. When they no longer need a crib, simply remove the rail, and ta-da, you have a regular bunk again.
If you’re full-time in your RV, or even if you’re not, you may desire more of a proper nursery space for your baby. Many on-the-road parents have opted to remove the bunks completely and put a freestanding crib in their place. This option also gives you more flexibility as far as toy and clothing storage. There are some truly beautiful RV nurseries that have been created out of bunk spaces.
If you do want to travel with a Pack-And-Play for your young children, check out our article on our sister site, Travel Trailer Pro, Does A Pack-And-Play Fit In An RV?
How Do I Add More Sleeping Space To My RV?

By now, you’re probably enticed by the idea of reclaiming some of that underused bunk space. But you may not be ready to fully commit to an RV that sleeps just two.
What if your older kids actually want to join you for a weekend? What happens when the grandkids are old enough for a sleepover? If these are concerns you have, consider an RV bunk bed conversion that utilizes multipurpose furniture.
The Expand Furniture Dormire Couch Transformer is a great place to start. This amazing sofa pops up into bunk beds in seconds. Whether you choose to place this magical piece of furniture where the bunks once were or simply replace an existing sofa is up to you.
If you have a freestanding table and chairs, that’s another great place to consider using convertible furniture. By installing a traditional dinette/bed instead, you’ll recover your RV’s sleeping capacity even if you’ve repurposed the bunkhouse into something else entirely.
Additional Considerations Before Remodeling
An RV bunk bed conversion can be an exciting blank slate. There are so many possibilities for that space. In all your enthusiasm, take care to consider weight, specifically the Unloaded Vehicle Weight (UVW or “Dry Weight”) and Gross Vehicle Weight Rating (GVWR) changes in your remodeling plans.
Regardless of your design vision, your RV is only rated to carry so much. Be careful that whatever you install in place of bunks, you don’t exceed the weight capacity of your rig.
Any alterations you make could also impact the tongue weight of your towable. Typical packing advice says you should concentrate the bulk of your load towards the front of the trailer to prevent sway . Since most bunkhouses are located in the rear, you should avoid installing particularly heavy structures there.
Final Thoughts On RV Bunk Bed Conversion Ideas
RV bunk bed conversions make it possible for your RV to grow with your family’s needs. From a crib and nursery to a kid’s bedroom, to a space for a grown child to come back home, there are countless options. Once you enter the empty nester phase of life, a home office or hobby room might be the perfect use of that space.
If you incorporate convertible furniture into your remodel, you can preserve the ability to host guests. Dual-purpose furniture provides sleeping options without you having to sacrifice the square footage you’ve only recently reclaimed.
While bunk beds are a coveted RV feature, they are only fully utilized for a brief period of time. Considering one of the countless RV bunk bed conversion options can prolong and enhance the usability of your rig.
Related Reading:
1. 10 best travel trailers with bunk beds under 7,000 lbs., 2. 8 best class a rvs with bunk beds, 3. 5 awesome class c rvs with bunk beds, 4. 12 best travel trailers with bunk beds, laura tyrell – author and part time rver.
Laura is a part-time RVer and a full-time mom of three. Long-time campers and RVers before children, Laura, and her husband have fallen even more in love with the RV lifestyle since becoming parents to a child with food allergies.
Having her own kitchen on wheels makes her RV trips amazing. Laura is passionate about finding ways to make traveling with young children fun, easy, and attainable.

Leave a Comment Cancel reply
Save my name, email, and website in this browser for the next time I comment.
- Air Conditioning
- Easter Eggs
- Tablescapes
- Pillows & Throws
- Doors & Windows
- Raised Garden Beds
- Centerpieces
- Party Decor
In-depth Guides
Product reviews.
- Rooms & Spaces
Living Room
- Fireplaces & Mantels
- Walkways & Paths
- Pools & Ponds
- Kitchen & Dining
- Laundry Room
- Home Office
- Windows & Doors
- Floors & Ceilings
- Ask DIY Question
- + Post Project
- + Post a new Project
- Saved Projects
- Notifications
- Account Settings
- Support • Privacy
- DIY Projects
Travel trailer remodel- how do I change the bunk beds in to a pantry?

You have a good idea going all ready! If you take the bunks out you can install shelves on the side from bathroom wall to outside wall. I would use the closet style plastic covered metal. They are really easy to cut to the exact length you need for each shelf. You can install them upside down so that the edge where you would normally hang clothes goes up so there will be a lip so your baskets or items won't slide off. The very best part of these shelves is that they are light weight and won't add to the gas mileage of your rig! Then you can use the rest of the space for your choice, tall storage for brooms or vac, or continue shelves, or use for more closet space. Put a curtain rod over the opening, use a top sheet long curtain and hide the storage. A fast and easy fix without needing a lot of experience to complete!
I just worry about taking the bunks out and ruining the wall they are attached to that is an outside wall. I do not want to damage the structure of my travel trailer. I do not have to worry about the weight issue, I live in this full time it is set up like a home I have a regular toilet hooked to a lagoon and am hooked to well water.
So do not attempt to remove it. Dress the area up with prety baskets and if there is room place a tension rod in between the wood and put up a nice drape of sort. This way it will not be obvious and at the same time usable.
You can go on Pinterest and search rv/camper remodel or upgrades etc... I have gone there and once you find something it just keeps going on with more ideas everytime you click to view an idea.
Removing the bunks, especially if you aren't towing the trailer should pose no problems. They were put in after the outside walls. Merry Christmas!
I would put large covered totes in the back corners that are hard to reach to hold oversized (maybe bedding) items that you use infrequently. Use a selection of coordinating storage items so it pleases you every time you access your "pantry". I would also add some of these handy storage bins from the Container Store. I label the front lips of mine to keep me better organized.
http://www.containerstore.com/s/kitchen/pantry-organizers/stacking-bins/12d?productId=10027640
https://www.amazon.com/Set-Metro-Magazine-Files-Plastic/dp/B001EHGT3K/ref=pd_day0_201_5?_encoding=UTF8&psc=1&refRID=BKM9297RQCJ2YV1BPZYF I use these to corral tall bottles, plastic/foil wrap boxes my stacking rv "glasses". Keeps taller things in place and you can sometimes find plastic ones at the dollar store.
I think i understand you are asking about removing the bunks. To remove them without damaging or compromising walls of travel trailer, you will need a "star" screwdriver or tip for a power one. We just did that in our RV to convert it into a bird room.
Ours were installed with "star headed" screws as is most things in RV's & even mobile homes. Look at underside of top bunk & locate screws. Remove them & that underpiece. It should reveal more screws to take out as is usual with each piece you remove. Expect that braces for bunks will most likely be aluminum. You will have a few small holes in walls but if taken out this way, your travel trailer will not be harmed or compromised. When finished removing bunks, use whatever shelves you wish. IF shelves don't seem solidly set, those can be screwed to the walls, just make sure you put screws into wall studs.
Hope this helps.
Its called a sawsall
We took our bunk beds out of our trailer. We had 2problems. One we had was with the light for the bottom bunk. It came from the outside wall and then was fed in between the space of the bottom bunk. we wrapped them with electrical tape so the rest of the lights worked. We didn't want the wires to fall down inside the wall, we taped them so they couldn't. We just hung a picture over the wires. The last problem was the back wall is curved, so the shelf doesn't sit against the wall completely, but it works. We have a lot more room.
Thank you , this comment explains how to do this very well.
Here's a few things from Pinterest:

Rv under bunk bed storage, removed bottom bunk pulled apart random plastic 3 drawer storage bins and put them back together 5 high.
Like the idea of replacing bunk beds with storage option. Any suggestion as to how to handle a CampLite 21BHS conversion where access to water heater bypass valves are under bottom bunk and to the rear.
We want to change our bunk area into a closet with a dresser
Here is a post that might help you https://chascrazycreations.com/11-amazing-walk-in-pantry-organization-tips-and-hacks/
Hope the redo went well. It would be great if you'd post how you completed the project and show pictures. I bet the change adds a lot of function to the space.
I would add shelves and bins, leaving the bunks in tact. I'm thinking ahead to resale possibilities. I would think it would be more if beds were still there and shelves & bins could be easily removed.
I like Janets answer Use pretty baskets from the $ Store and put a curtain in front. Also use bungee cords to secure the items in the pantry.
Related Discussions
Vinyl plank flooring vs pergo (laminate).
I currently have stinky dirty carpeting in my living room and I want to replace it with a durable flooring that can stand up to dogs and kids.
How to remove popcorn ceiling that has been painted?
Does having a paint over a popcorn ceiling change how I'd remove the popcorn ceiling?
Where is a good, honest place to buy mattresses?
How to apply peel and stick wallpaper?
I want to spruce up my walls with peel-and-stick wallpaper. Has anyone used this before and can advise me as to how to apply it properly?
How to stain wood floor?
I've heard staining is a good technique for updating floors. So how do I stain my wood floor?
How can I make this hidden door more hidden and less hideous?
I have a hidden door though it doesn't look so hidden at the moment and I like the appeal of a hidden door. We do need to use the door, but not often. This is in a b... See more

Decorating around this tiny door?!
This is in our master bedroom. As of now we have nothing there because we are confused about what to do. We can't cover it up completely because we have made the room... See more

Suggested Project Book

30 Stylish Update Ideas You'll Want To Use For Your Bedroom
IMAGES
VIDEO
COMMENTS
3. The steps to take. First, remove all bedding so you can see the bare bones of the bunk beds. Second, remove any lights, to other components that may be in the way of removing the bunk beds. If there are components underneath the lower bed, do not remove those if they are vital to your RV's operation.
This video shows the removal of the top bunk in a Jayco HT 29.5 BHDS fifth wheel travel trailer.
To remove RV bunk beds, start by detaching the screws and bolts securing the bed frame together. Lift and slide out the individual bunk bed pieces carefully. Repurpose the space for storage or additional seating options after removal. Making this change can enhance the functionality and comfort of your RV. By following these steps, you can ...
Bunk removal in 278BH - Success. We just brought home our 2022 278BH this week and the first project was to remove the top bunk to give our teenager more room. Here's what we found to be the easiest process: - Remove the front trim molding. - Remove screws from top of bunk, they are screwed into the wood trim pieces underneath the bunk that ...
Removing the bunks in our 2021 Heartland Prowler 290 BH to make the area more efficient and useful for our needs in Alaska. #RV #TravelTrailers #Alaska #DIY ...
Grand Design Imagine XLS 21BHE Bunk Bed RemovalI removed the top bunk to create more space and a great little place to relax or work.Listed below are a few e...
Tools. Removing RV bunk beds without damaging or compromising the walls requires that you have the following tools: A screwdriver - star, square. A hammer or mallet. A Prying tool - flathead screwdriver and long crowbar. A hammer and a chisel (optional) An oscillating tool with a carbide blade (optional) A joint knife.
Posts: 7. Jay flight 264bh bunk removal. We don't have small kids or anyone that would appreciate climbing into the top bunk so I got rid of it and tuned it into a shelf for our new day-bed/reading room. Thought I'd share in case anyone was thinking about it. It's a 2022 model and in removing things I found a Dewalt square drive bit that ...
Just for a laugh I asked for a quote to remove the top bunk-The cost is $720 they said. The equivalent of four hours service charge. I said never mind, I will do it myself. FYI-the shop said along with being screwed into the walls, the wood mattress frame is also epoxied.
Posts: 5. I started to remove an upper bunk to make room for my bicycle but quit the project. The side supports and cross members for the upper bunk were screwed in from the outside underneath the skin. I would have to cut the screws to free the bunk. Once I did that I would not be able to replace the bunk later on.
04-20-2021, 06:16 PM. # 1. mlcampbell0917. Junior Member. Join Date: Apr 2019. Location: Daphne. Posts: 20. 25BH Upper Bunk Removal. We have a 2016 25BH and would to remove the upper bunk for more room for the lower bunk.
We removed our top bunk out of our 2021 Keystone Hideout 26BHWE in order to gain more space for our guests. Here is out to remove the top bunk. If you have a...
Member. Aug 18, 2017. #3. Hi Debster61, I had a Wilderness that I removed the upper bunk from. On that one it was pretty simple, I just removed the plywood that was underneath the mattress (not secured just laid in on top of the frame) which exposed about 8 screws around the frame that held it to the wall. After removing those everything slid ...
Posts: 2. We removed the top bunk in our 2400bh. This is how we did it: (1) Remove all the window shades and valences from the top and bottom windows its just a few screws. then remove the top plywood sheet by removing all the screws. It is in 2 pieces. keep one piece to sit on while removing the support screws.
Jayco RV Owners Forum > Trailers, 5th Wheels, and Motorhomes > Jayco Travel Trailers: removing bunk beds Click Here to Login: Register: Registry ... I sure it can be done just be aware that you may ruin your chance of reselling it as a BH model if you remove a bunk. _____ 2018 28BHBE 2017 Ford F250 XLT, 6.2 gasser 2013 26BH ...
5 RV Bunk Bed Conversion Ideas. 1. RV Bunk Bed To Pet Bed Conversion. If you have a four-legged travel companion, a great RV bunk conversion idea is to transform the bottom bunk into a pet sanctuary. For larger dogs, this space is usually the right size for their bed. If you have a smaller furry friend, you might be able to fit all of their ...
For more details on this part of our large family camper makeover please see the accompanying blog post: https://marriedtothefarm.com/2020/08/06/how-to-take-...
Forest River Forums > Fifth Wheels | Travel Trailers | Ultra Lites > General Travel Trailer & Fifth Wheel Discussion > Flagstaff: upper bunk removal Click Here to Login: Portal: Register: Library: Registry FAQ ... upper bunk removal. Our 2018 25BRDS upper bunk is never used except for storage. I am thinking of removing it and installing shelves ...
Join Date: Nov 2016. Location: Horseshoe Valley. Posts: 3. removing top double bunk. We are thinking of getting the 2017 Eagle HT Fifth Wheel 29.5BHDS. We don't have kids, but we do bring friends! Thinking for two grown adults crawling in would be silly, if they are sharing a bed. So we are going to take the top bunk out so adults can sit up.
Call Fleetwood, they would be able to tell you if removing the bunk would cause problems and how to safely remove it. That would probably be the best way to do it. If there is a reputable RV dealer that sells Fleetwood near you, that is an option, too. See 1 previous. Nancy Turner on Mar 20, 2019.
Photo 1: shows what we found after we removed the mattresses and pried off the thin piece of plywood from the bottom of the upper bunk. The plywood was just stapled to the frame. That allowed us to see just where the upper bed frame was mounted to the wall. Photo 2: shot from above upper bed frame.
Put a curtain rod over the opening, use a top sheet long curtain and hide the storage. A fast and easy fix without needing a lot of experience to complete! Melissa on Dec 11, 2016. I just worry about taking the bunks out and ruining the wall they are attached to that is an outside wall.
Scott from Southern RV LLC in DeLand, FL surprised us by not only showing us how to remove the dividing wall in our newly purchased 2014 Jayco Jay Flight Swi...