

Best Travel Trailer Skirting For Winter

Sharing is caring!
Before and throughout the winter, travel trailer skirting becomes quite the commodity. Winter is an interesting conflict for RVers. While the world becomes blanketed in serene, white-crystal beauty, RVs turn into warm pockets of defense against the harshly cold elements.
Travel trailer skirting blocks winter breezes and gales from reaching beneath the RV, rapidly cooling the undercarriage and, eventually, seeping into your home. A cold undercarriage, combined with the inevitable seepage of warm air through the flooring, creates a determined, wintry intruder that’s difficult to keep out.
The best RV skirting does just that and, if you enjoy vacationing throughout the winter months, or are a full-time RVer, the inevitability of a solid RV skirt is paramount. This is especially true north of the Mason-Dixon line, where winters are crueler and longer.
What is Travel Trailer Skirting?
RV skirting is a material that surrounds and encapsulates the void beneath a travel trailer, balancing the interior temperatures within and combatting the elements without. They are typically made of vinyl, though foam board, canvas, plywood, and even metal are sometimes used.
It’s a winter upgrade, and its installation does more than just keep out the chilly winds. Skirting also drives down your power consumption via heating needs. Whether you’re running an electric RV furnace or strictly propane, it takes less power to heat the interior of an RV protected by skirting.
It also keeps out critters, who will happily seek out and target the warm pocket of your RV to escape the winter elements. It keeps your pipes from freezing, protecting your undercarriage from the sub-freezing temperatures that a fierce wind will only exacerbate.
However, as much as travel trailer skirting improves quality of life in the winter, it also has uses in the summer. Again, it keeps out the critters and the bugs, both of which are far more numerous in the spring and summer months. It also protects the RV from heat and sunlight in the summer, creating a sort of shady interior beneath your RV that contributes to your cooling needs.
Admittedly, RV skirting is nowhere near as predominant in the summer as it is in the winter, though it still has its uses in the former.
Does Travel Trailer Skirting Work?

Travel trailer skirting works very well, which is why it’s a popular option among RVers, especially those who live in their RVs all year round. Skirting is simplistic in design and function, which makes it questionable as a functioning asset. Oftentimes, however, simplicity is best.
All the skirting needs to do is keep out the cold air while retaining the lost heat from within the RV, all in one big, happy bubble. Since heat rises, having a warmer undercarriage is highly beneficial and your furnace would thank you profusely, assuming it had a mouth to do so.
After all, we build walls to protect us from the elements, both natural and man-made, and skirting is nothing if not the same from a conceptual perspective.
That heat bubble may not be as warm as the interior of your RV, but it’s more than enough to aid your temperature controls and keep your tanks and pipes from freezing, all while keeping the local family of mice from seeking refuge beneath your flooring.
It even helps RVs with enclosed, heated underbellies. While the heated undercarriage may not freeze, unless you’re parked somewhere in North Minnesota or Alaska, the skirting adds another layer of heating assistance to your existing system. Again, this drives down the overall cost of heating.
If you’re still on the fence, purchase enough insulated foam board for a DIY skirting project. You don’t have to go wild with expense here, just enough to see the difference.
The insulated foam board will offer enough protection and reduced energy waste to convince you to pick up a professionally manufactured version for next season.
What is the Best Travel Trailer Skirting for Winter?
The best travel trailer skirting for winter will always be one of those controversial topics within RVer circles. We all have our personal preferences, and it’s hard to imagine ourselves choosing the lesser RV skirting. Well, that’s what articles like these are for.
Besides, the best of the best might not always be what everyone thinks it is. Especially when it comes to number three (which might be a surprise to some).
The good news is, that these RV skirting manufacturers are well-known entities in RV circles. They’re well-known because they produce effective travel trailer skirting with plenty of longevity.
Our Pick For Best Travel Trailer Skirting: AirSkirts

Our Pros and Cons
One of the biggest upsides to AirSkirts is its simplicity. AirSkirts advertises its product as a simpler application than any DIY travel trailer skirting project. The surprising thing about AirSkirts is how well-known they are, despite barely being three years old as a company.
That’s right, AirSkirts hit the retail market in 2020. In fact, the company was founded in January 2020, already making massive headway into the RV skirting market. The product became this way thanks to a cost-effective and relatively innovative setup, along with a high degree of durability.
There’s no getting around the fact that purchasing AirSkirts is a pricey proposition. They aren’t cheap by any means. However, you don’t have to have your rig professionally measured and you don’t need professional installation. AirSkirts pricing is comparable to a professional installation.
You can be assured that with that higher price tag comes a very high-quality product that uses the best materials.
When you purchase an AirSkirts product, you provide the dimensions, along with your rig type and your ground clearance. Once you have the product in hand, you’re looking at 15 to 30 minutes of installation time, and you’re done.
Check out this video below, where Mike from RVBlogger shows you how he installs AirSkirts on his Class C RV in just under 15 minutes! And he and Susan do a temperature test to show you how well AirSkirts works.
Another Great Travel Trailer Skirting Option: EZ Snap

EZ Snap is one of the most popular travel trailer skirting options on the market today. They’re easy to order and the DIY installation process is fantastic. All you have to do is provide EZ Snap with the dimensions and clearance of your RV, and they will send all the materials you require.
Not only do you get the vinyl, but you also get all the mounting hardware. In terms of hardware, you have several options, with adhesive and snap-on options being the most popular of the installation methods.
EZ Snap’s vinyl sheets are manufactured using EZ Snap’s diamond weave technology, which is designed for a number of things other than durability (though they are incredibly durable). Diamond weave vinyl from EZ Snap is designed so you can easily cut the fabric to length. You don’t have to hem the cuts, either, as the material will not fray.
The order process is very simple, and you can have someone come out and measure if you want (though you don’t even have to wait for them to start the installation process yourself). All-in-all, EZ Snap is a top, go-to RV skirting manufacturer that produces high-quality skirting you can depend on throughout the winter.
DIY Options For Travel Trailer Skirting

Travel trailer skirting doesn’t have to be something you purchase, ready-made, from a business.
You’re perfectly capable of doing the entire thing yourself. As long as you know what your options are and how to install it. There are also a number of materials that work well.
- Insulated foam board
- Wood boards (Permanence)
- Metal (Permanence)
- Heavy-duty canvas
- Plastic sheeting or tarp
- Hay bales (Permanence)
As you can see, some of the above options are meant for RVs that aren’t going anywhere anytime soon. Out of the others, insulated foam board is probably the most popular. With foam board, you can insulate a fairly large RV without spending more than $200.
When you compare $200 and a little extra elbow grease over the $1,000+ it takes to purchase some RV skirting from a reputable manufacturer, you can see the appeal of the DIY option.
Do You Really Need Travel Trailer Skirting?

If you plan on spending time camping in the winter, especially in weather that easily drops below freezing, you need RV skirting.
Full-time RVers will appreciate the year-round benefits of both cold and warm weather insulation along with the hidden storage.
5 Advantages Of Travel Trailer Skirting
We’ve covered the things that RV skirting brings to the table sporadically above. However, if you’re new to the RV lifestyle and plan on camping in the dead of winter, you may need some reassurance that RV skirting is necessary.
1. RV Skirting Protects Your Pipes and Tanks From Freezing
One of the major benefits of RV skirting is this, right here. Frozen tanks or pipes are never a good thing, and there’s a good chance it will cause permanent damage.
Serious replacement or repairs to your pipe system or tanks will make that $1,000 cost for RV skirting look like an easy trip to the convenience store.
Of course, frozen pipes will also place you in a difficult situation, with no water flow. This is a bad position to be in, with toilets you can’t flush, no running water, no cleaning dishes, and no laundry (if applicable in your travel trailer). It’s not a situation you want to be in.
For more info about adding heating pads to your tanks, check out our article on MotorhomeFAQs.com called When to Turn on Your RV Tank Heaters .
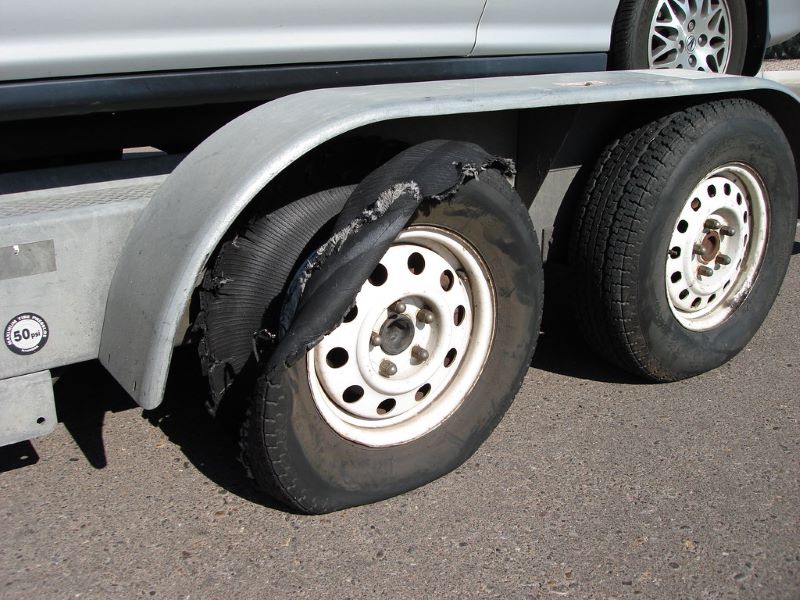
2. Protects Your Tires
We didn’t list this one above but stable temperatures and no UV exposure is beneficial to your RV’s tires and travel trailer skirting can provide both.
3. Saves Money on Propane or Power Costs
Most RVers rock a propane-powered furnace but there are electrical alternatives as well. However, there’s no arguing that heating costs rise exponentially if you are consistently fighting below-freezing temps.
If you’re using propane, you’ll burn through it like crazy. A winter spent RVing will leave you with a large propane bill and lots of hours on your hard-working furnace. Investing in skirting can offset these costs greatly.
4. Keeps You Warmer and More Comfortable
Heat rises, and though the bottom of your RV, outside, is colder than it is inside, it’s much less so when you have RV skirting on. That makes it easier for you to keep your travel trailer’s interior warmer, since the heat loss in the floor is contained, keeping the floor warmer.
Cold-weather camping can be enjoyable if you’re prepared and have your RV insulated properly. Skirting is, without a doubt, the key component to comfortable cold-weather camping.
5. It’s a Good Storage Option
Travel trailer skirting is effective enough that you can use space below your undercarriage as a temporary storage option.
The RV skirting will help keep out bothersome critters and rodents, so your stored things will be protected from both the elements and the curious rummaging of a cold mouse.
How Much Does Travel Trailer Skirting Cost?
On average, expect to pay about $1,000, with prices potentially as low as $800 and as high as $3,500. However, if you decide to make it a DIY project, you will lower your cost by a lot. A solid, DIY travel trailer skirting project will cost as little as $100 and as much as $250.
That makes the latter option a highly respected and viable alternative to seeking out RV skirting manufacturers. That’s not to say that it’s a better option than the more expensive, professional alternatives.
In fact, companies like EZ Snap and AirSkirts will provide you with precision and more longevity than you’re likely to get with a DIY option.
How to Measure for Travel Trailer Skirting

Two things you should remember when measuring for RV skirting: The overhang section of a fifth wheel needs to be enclosed as well and always measure your slides to include in your overall dimensions.
Make your way around the RV, measuring as accurately as possible. If you lack a tape measure long enough to provide you with measurements on the lengthier portions, bring along a helper to mark your positions.
Make sure your slides are out and you measure them accordingly. After you get your 2D measurements, it’s time to go 3D and measure out your clearance (Bottom of your RV to the ground). Be sure to include the fifth wheel overhang if that’s applicable.
In fact, you can square off the entire overhang section and treat it as its own block, adding it to the overall dimensions when you’re done.
Make sure you write all of it down, including the associated sections you measure. Also, it’s always a good idea to do it again, just to make sure. Once you call it in, any mistakes are too little too late. Fortunately, most RV skirting manufacturers supply a little extra on the material side.
5 FAQs About Travel Trailer Skirting
1. does travel trailer skirting work.
Travel trailer skirting definitely works. So long as you use material with insulative properties and cover the entire clearance beneath your RV. It will retain heat and prevent cold air from freezing your pipes and tanks.
2. How does RV skirting work?
As insulation, it stabilizes the air trapped beneath the RV, preventing the outside air from cooling the clearance space below the travel trailer. It also retains heat loss from the interior of the RV as it seeps through the floors.
3. How do I know how much I need?
By properly measuring the dimensions of your RV, including slides, clearance, and fifth-wheel overhang (if applicable), you will be able to accurately determine how much RV skirting you need. However, it’s always best to err on the side of larger dimensions.
4. What type of travel trailer skirting material is best?
The type of travel trailer skirting that’s best is a close gamble between insulated foam board and vinyl that’s manufactured specifically for RV skirting. Any material that reduces the wind tunnel created by the RV’s clearance helps.
The most important thing is to use quality materials that will hold up. One of our cons on the Airskirts skirting system above was how heavy it is when packed up, well that’s because the vinyl used is thick and of the highest quality.
5. Is it worth the cost?
It’s absolutely worth the cost, considering the damage that freezing weather could cause to your plumbing system and your tanks. Damage to either has the cost potential to eclipse even the most superior, premium RV skirting materials on the market.
Final Thoughts About Travel Trailer Skirting
Unless you are a part-time, summer-only RVer, travel trailer skirting is an essential addition to your RV gear. Consider it a part of your preparation methodology—a necessary component forever on stand-by for those cold, winter months.
It’s so much better knowing you can go outside and enjoy the winter landscape and possibly build a snowman without worrying over the damage that an unprotected undercarriage will possibly cause.
Do yourself a favor. An RV is an enormous investment and, like any major investment in your life, it should be protected. Install your RV skirting, then go inside and have a cup of hot cocoa. Your RV is good to go and so are you.
Related Reading:
1. How To Insulate An RV Underbelly 2. How Many Gallons Are in a 30-lb RV Propane Tank? 3. 8 Best Travel Trailers Without Slideouts 4. 10 Things to Know About RV Window Replacement 5. Are Indoor RV Storage Facilities Worth It?
About the Author:
Thomas Godwin is a full-time freelance writer with a BFA in Creative Writing, a U.S. Marine, and an avid outdoorsman.
When he’s not writing, he’s raising chickens and Appleyard ducks. Thomas also constructs teardrop campers (attempting to anyway) and kayaks the Blackwater River with his wife, two daughters, and his Dobermans.

Recent Posts
RV Tire Pressure: Everything You Need To Know
What Gear Comes with A New Travel Trailer?
The RV Skirting Pros
Rv skirting products specially designed for fulltime families, shop rv skirting, the essential addition to your rv.
Living the RV or tiny home life can be exciting, but it can also be hard and expensive to maintain in the cold months. Frozen pipes, high fuel and heating costs, unbearable cold, and RV damage can be common issues for full-time families in the winter. Investing in RV skirting can make these problems a thing of the past while reducing maintenance and repair costs (and the fuel bill). Keep your family warm and safe, and protect your home.
Learn Why R-Values Matter More Than Temperature Ratings
The R-Skirt insulated skirting system will keep your family warm and protect your undercarriage and utilities from cold weather and freezing temperatures.
With this convenient, efficient skirting, you can say goodbye to frozen pipes and the high fuel costs of heating your rv. our insulated rv skirting for winter is the only one on the market to feature r-7 insulation value, or any r-value at all in addition, the insulated r-skirt is the only skirting on the market with a proper temperature rating of -2º to -11º f, although our materials can withstand temperatures of -40º. create a durable shield against the cold with six layers of insulating material quilted together. the r-skirt keeps you cozy wherever the road takes you., get a warm and cozy night's rest knowing your rv will stay put and keep the cold out with durable, military-grade skirting materials. our materials are flame retardant, uv protected and mold and mildew resistant. you'll find this quality on both the standard rv windskirt option and the insulated one. .
- Attractive diamond weave pattern RV underpinning
- Skirting options for campers, travel trailers and 5th wheel skirting
- Freedom from frozen pipes
- Fuel savings of around 50%* and
- Fewer utility repairs and maintenance calls
*As reported by customers.

Insulated RV Skirting Helps You Stay Cozy
*After the 1-time initial setup.
The Original RV Skirting Track System
- No-hassle installation and removal
- Set up or remove in under 20 minutes*
- Minimal screws and buttons
Visit the Skirting Store

Invented By a Fulltime RV Family in the United States
- Easy access to storage spaces
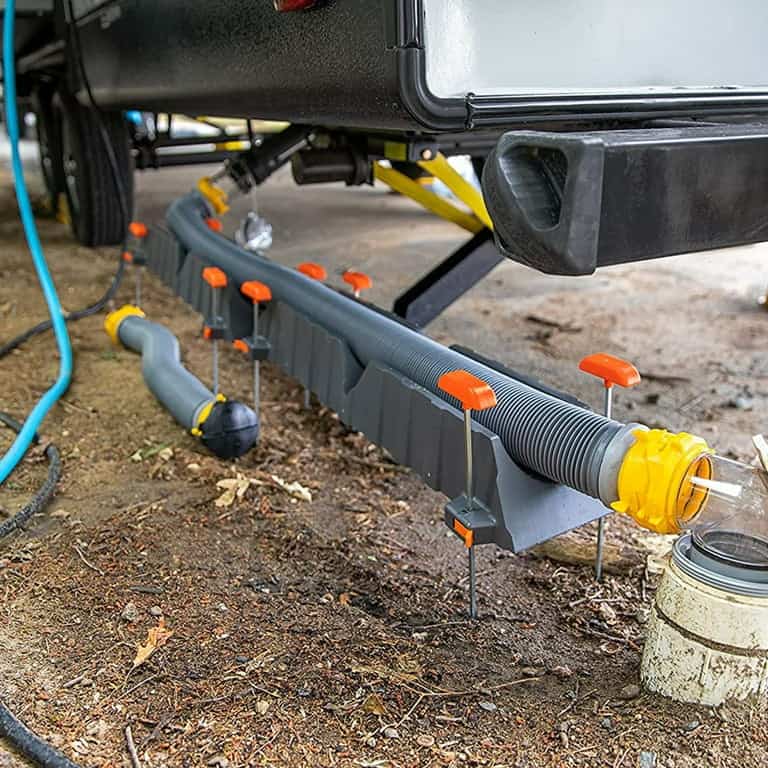
- Tastefully covered sewage lines
- We tested and used the same fifth wheel skirting with our RV
Meet the RV Skirting Pros

* We recommend contacting your warranty provider before adding skirting to ensure coverage.
*Custom quoted pricing is guaranteed for 30-days. Prices are subject to change beyond 30 days.
Invest in Your Home
Our pricing calculator gives you customized pricing of the RV skirting costs for your camper, trailer, or 5th wheel. The price is guaranteed* and includes taxes, fees, and delivery for DIY skirting kits. Installation options are also available.
- Michelle R
Top notch product & installation! We had it done in the fall of 2020. The tech was here about 8 hrs, for our 36ft 5th wheel. Left the area as clean as when he came. We’re full time RVrs and skirting has been worth every penny! When the wind is howling, even to -20* we’re comfortable in short sleeves & barefoot. We like the smooth lines (no buttons or turnbuckles) and in summer, or when it’s time to move we wash the pieces, fold, and store, underbelly.
- Kathleen C
Would highly recommend! We weren't able to get a custom install due to our location from any company. Found these guys online and read reviews on how easy it would be to install yourself. It was! Their kit is so complete with everything you need. You send them photos of your rig and they mark exactly where to place everything. We took the weekend to install it. We couldn't be more satisfied with our skirting. The Reed's have wonderful customer service! Well worth it.
- Christopher B
From the moment you submit your order the communication is there. Product is quality. Arrived at site on day promised and updated with time of arrival. Professionally installed while listening to our concerns with access to our tanks, propane, etc. Awesome experience with this company! Will be recommending for sure.
The Skirting Co has a fair price and a premium product. In my mind you definitely get more value for the money. With The Skirting Co you get a quality product with professional installation if you opt for it(l (they also offer a DIY kit). It works great and keeps us warm even in the single digit weather we had last week the rv stayed a cozy 71F by running off space heaters. If I ever need another RV skirt The Skirting Co will definitely be getting my business!
I could only find companies that required on site custom fitting/installation, or cheaply made material that could be shipped. Living in Alaska, the on site fitting/installation wasn’t an option. I found these guys and could not be be happier with the purchase. They showed me the best location to install the rails and were prompt to answer any questions I had. Comparing my camper skirt to others nearby, the difference in quality is very clear. I’ve had multiple compliments about the look and durability of the material.
The Skirting Co has a fair price and a premium product. In my mind you definitely get more value for the money. With The Skirting Co you get a quality product with professional installation if you opt for it(l (they also offer a DIY kit). It works great and keeps us warm even in the single digit weather we had last week the rv stayed a cozy 71F by running off space heaters. If I ever need another RV skirt The Skirting Co will definitely be getting my business!
Our customers are a big part of our company— an extended family. We update our products with customer suggestions and value your input. See what some of our customers have to say about their 5th wheel, travel trailer and camper skirting.
Reviews From RVers
Save money with our do-it-yourself rv skirting kit, shop rv skirting and diy installation kits.

Save Time with RV Installation
Contact us for pricing.

*Special consideration is given for group orders.
RV Skirting FAQs
Frequently asked questions.
Choosing RV skirting is a big decision, and we are here to answer all your questions. Visit the FAQ page for answers to general skirting questions, RV skirting product information, and payment and discount details.
Be The First To Know
We are on a mission to provide the best tips and tricks to the RV community. Get updates directly to your inbox, so you don't miss a post, sale, or discount.
*** We promise never to sell your information or send you SPAM! ***
Your Online RV Community
Follow along on our social media platforms for updates on rv skirting products, access to resources, and connect to a private online community of rv owners all over the us and canada..
Website by Avenlee Collective
© 2022 All rights reserved by The Skirting Company
Privacy Policy
Shopping Cart
(574) 402-0055, [email protected], 1255 s 1075 e, akron, in 46910, installation, rv skirting, the skirting store.
5 DIY RV Skirting ideas for Winter for Any Budget

If you live or extensively camp in an RV in the winter in a cold climate, you might need RV skirting. And as you probably know: custom RV skirting solutions are pricey! In this article, we’ve compiled 5 of the best DIY RV skirting ideas for winter for any budget.
If you’re looking for cheap RV skirting, you’ll find it here! The prices of these DIY RV skirting projects range from less than $100 to more than $800.
Each DIY skirting option has a full video tutorial, and we’ve also included supplies lists and step-by-step instructions. Let’s dive in!
This post contains affiliate links. This means that if you decide to make a purchase after clicking a link on our site, we may earn a small commission at no extra cost to you.
Table of Contents
5 DIY RV Skirting Ideas for Winter
- DIY RV Skirting with a Tarp
- RV DIY Vinyl Skirting
- DIY RV Foam Board Skirting
- RV DIY Skirting with Canvas
- DIY RV Plywood Skirting
There are many ways that you can skirt an RV, and there are options and methods for every budget.
Some people want a custom solution, but that’s not always feasible for everyone. Luckily, you don’t have to buy expensive custom RV skirting to protect your RV in the winter.
Just like many things in RV life, you can DIY it! You can choose tarp, vinyl, foam board, canvas, or even plywood or particle board to skirt your RV. Each option is effective–your lifestyle and budget will determine what works best for you.
Honorable Mentions But Not Recommended:
- DIY RV Skirting with Hay or Straw Bales – While some RVers recommend this, we advise against it. Hay and straw is a fire, pest, and mold hazard for your RV.
- Reflectix as DIY RV Skirting – Reflectix is more expensive than other options, and it’s very lightweight. It works for some, but we here at RVHQ think there are better options.
Who Should Skirt Their RV in the Winter?
Not every RVer needs to skirt their RV in the winter . Especially not those who are traveling every couple of days or who are in warmer climates! RV skirting will benefit you if you are:
- A stationary RVer in a climate that regularly dips below freezing.
- A traveling RVer who spends weeks at a time in a climate that dips below freezing.
- An RVer of any kind in an RV that does not have an insulated underbelly.
- Planning to regularly use your RV plumbing in sub-freezing temperatures.
- Looking for a way to better insulate the interior of your RV.
There are RV skirting solutions for every type of RVer. Keep in mind that if you’re a full-time RV traveler who never stays in one place long, this means extra work for you every time you set up and tear down camp.
Unless you have a 4 season RV with an insulated and heated underbelly, it would be wise to skirt your RV in extreme cold temperatures.
Does R-Value Matter for RV Skirting?
R-value doesn’t matter as much for RV skirting because trapping air is the main goal. Sealing up gaps and cracks that allow drafts is more important than the thickness of your material.
R-value is a number assigned to insulation that tells you how quickly heat or cold will pass through. Higher R-value means a higher level of insulation, but this isn’t as important for RV skirting.
RV skirting works by trapping air beneath your RV. This air creates an insulated layer between the underneath of your RV and the cold outside wind. The air underneath is heated by the underbelly of your RV, and the skirting traps it in place. This is how your pipes stay protected and your RV stays warmer with RV skirting.
Considerations for DIY RV Skirting
Everyone RVs differently. Some of us live stationary on a tight budget, others travel every so often and have a bit more budget to work with. Here are the main factors to consider before deciding on which method and material works best for you.
- Material weight and rigidity
- Are you stationary or traveling in your RV in the winter?
- Physical ability
Obviously, budget plays a huge role for most of us. And with the way prices are rising lately, this may be even more important!
The DIY RV skirting ideas in this article range from a cool $75ish all the way upwards of $800. We’ve compiled ideas for every budget.
Material Weight and Rigidity
Material weight and rigidity play a major role depending on your climate and lifestyle. If it’s really blustery and windy during the winter where you are, you’ll want something that can stand up to the weather. You don’t want to have to do a lot of maintenance to put your skirting back in place!
Also, the weight of the material plays a role into how transportable it is if you move a lot. If you choose plywood and you have to move every couple of weeks, it’s going to get old fast.
Stationary or Traveling RVers?
If you’re a stationary RVer, the DIY RV skirting options are really only limited by your physical ability and budget.
If you’re traveling a lot, you may want to consider an option that may cost more up front, but is easier to install, remove, and store–like vinyl.
Physical Ability
DIY RV skirting is no easy task–no matter which method you choose. Plan to spend an entire 2+ days measuring, preparing, and installing your material.
This will involve a lot of bending and standing, squatting, and possibly even lifting.
1. Cheap DIY RV Skirting With Tarp for Under $75
The YouTubers Less of Life skirted their fifth wheel with tarp for less than $75! This process uses tarp, fence posts, and gravel from their campsite to keep their skirt in place and looking great. Here’s how they did it.
Materials Used:
- 4ft Step-In Fence Posts
- Heavy Duty Black Tarp
- Twine to secure it.
- Electrical tape to seal holes and cover twine.
- Gravel from the campsite to weigh down the bottom.
Tools used:
- Measuring tape
- Place the fence posts about every 10 feet and on corners around the camper.
- Measure from the ground to the bottom of the camper.
- Cut tarp, leaving 4-5 inches for the bottom to be secured with weight like rocks or cement blocks.
- Cut small holes in tarp near fence posts to secure tarp to the posts.
- Cover twine and holes with electrical tape.
- Use gravel from the campsite to weigh down the bottom of the tarp to keep it in place.
2. DIY RV Vinyl Skirting Just Like the Pros Do It – $800
The Camper House YouTubers created DIY vinyl RV skirting that looks just like the custom RV skirting you can buy online!
The only downside here is the cost — this one comes with a higher price tag, but it’s definitely worth it.
They saved over $1,200 by doing it themselves instead of ordering a custom DIY kit.
The end result is an amazing DIY RV skirt that looks custom and professional. They filmed a very informative step-by-step YouTube video of every part of the process so you can follow along.
- Press-N-Snap tool
- Vinyl Cement
- Velcro for creating access areas
- RV butyl tape
- Tape measure
- Silver sharpie
How They Did It:
- Measure the perimeter of your rig including slide outs. Measure the total length and the height from the ground to the camper.
- Purchase supplies.
- Screw snaps on your RV around your desired skirt height. Place them 8-10 inches apart.
- Place butyl tape on back of snaps before screwing into your RV. This is essential to prevent leaks and water damage.
- Unroll vinyl and prepare to install snaps. The Camper House folded the top of their vinyl over to make it more sturdy.
- Align your vinyl and use the silver sharpie to mark your first snap location. Install the snap on the vinyl, snap to your RV, and keep going along the entire RV.
- Cut your vinyl to fit along the curves as you go. This ensures a totally custom fit.
- If your vinyl isn’t long or wide enough in some areas, use vinyl glue to attach another piece.
- Using 1-inch PVC pipe, fill with sand and cap both ends. This will be the weight that holds down the skirting.
- Use PVC clamps to hold weight in place.
Related: How to Insulate your RV Slide Outs
3. Cheap DIY RV Skirting With Billboard Vinyl for $200
Ashley Mann of RV Inspiration made her own custom vinyl RV skirting. Instead of purchasing brand new vinyl, she used billboard vinyl and was able to complete this project for only around $200!
If you want a vinyl skirt for less than the previous tutorial, be sure to check out this article.
Materials Used:
- Billboard vinyl
- Brass tarp grommets and grommet tool
- Steel tent stakes
- Clear adhesive hooks
- Grommet tool
- Measure your RV length and height from the ground to the RV.
- Draw on a piece of paper to visualize the pieces you’ll need and the sizes so you have a better idea of total vinyl needed.
- Order your supplies.
- Cut the billboard vinyl.
- Install the adhesive hooks all around your RV a few inches apart to hang the vinyl.
- Using the grommet tool, install grommets all along the vinyl to match up with the hook locations on your rig.
- After hanging the skirting, go along the bottom and install grommets to use tent stakes to secure it to the ground.
Be sure to check out Ashley’s post on RV Inspiration for the full tutorial!
4. Cheap DIY RV Foam Board Skirting for Under $120
This video is another tutorial from Ashley Mann from RV Inspiration, but in this video she shares how she and her husband made DIY foam board fifth wheel skirting for less than $120.
When the RV park they moved to told them they only allowed foam board to be used for skirting, they knew they couldn’t re-use their billboard vinyl. But they ended up liking the foam board so much that they weren’t even disappointed.
- Foil-backed polystyrene foam board
- Foil HVAC tape
- White duct tape
- Bulk tent stakes
- Pocket Knife for cutting foam board.
- Measure your RV length and height from the ground to determine how much foam board you’ll need.
- Purchase your supplies.
- Measure and mark the foam board to prepare to cut it to size.
- Score along the foam board where you marked it to make it easier to cut. Keep cutting along the line until you cut all the way through or are able to snap it clean.
- Tape the foam board insulation to your RV with foil HVAC tape. Make sure the foil side is facing inward to help retain heat.
- Use white duct tape to hold corners of the foam board together and seal gaps in the foam, but try not to get it on your RV.
- Use tent stakes on the front and back of the foam board to hold it in place.
5. DIY RV Skirting with Canvas
PrjktPAYDAY on YouTube created a DIY RV skirt for their travel trailer using a canvas tarp and snaps.
The installation process here is similar to installing any kind of vinyl DIY RV skirting.
The main idea is to order enough canvas to cover the length of your rig and height of the gap with a few inches left at the bottom for weighing it down. Then, using an adhering method of your choice (they used snaps), adhere the canvas tarp to the travel trailer, fifth wheel, or motorhome as a skirt.
Lastly, weigh it down and be sure all gaps and cracks are closed to prevent drafts.
- Canvas tarp
- Adhesive hooks
- RVHQ Recommends Butyl Tape
- Install snaps on your rig several inches apart. They used adhesive hooks for areas of the canvas that already had grommets, which probably saved them some time and effort.
- prjktPAYDAY does not appear to be using a butyl tape or sealant behind the snaps they screw into their travel trailer. We highly recommend this to avoid future water damage to your RV.
- Align canvas with the snaps on your rig and install snaps along the top of your canvas.
- Weight down the bottom of the canvas. These YouTubers used small boulders found around their campsite to hold down their skirt.
Pros, Cons, and Things to Think About
There are pros and cons to each method and as you can see from the videos and articles referenced here, every RVer has a different way of doing things.
How you choose to adhere your skirt to your rig is totally up to you!
Snaps are a great choice and they’re what the professionals use. They can be re-used each season and they don’t draw too much attention to the eye when they’re not in use.
However, if you don’t install snaps properly, they can lead to leaks and water damage in your RV. Always use some type of sealant like butyl tape under your snaps to make them water tight.
Adhesive hooks and strips are an easy, non-invasive solution. However, they can be difficult to remove, are more obvious to the eye, and may leave residue or strip your RV finish.
You can use HVAC tape on your RV without worrying about residue or finish-stripping, but never use duct tape. Duct tape of any kind will leave residue and can strip paint and finish off your RV.
- How Much Snow can a Camper Roof Hold?
- Dehumidifier vs Damprid: Which is Best for RVs?
- Can You Install a Diesel Heater in a Camper?
DIY RV Skirting Ideas for Winter: Wrapping Up

Whether you choose foam board, vinyl, canvas, or even plywood to skirt your RV, you’re making the right choice!
They’re all effective solutions to help keep the underbelly of your RV insulated in cold winter temps.
These DIY RV skirting ideas can be used for motorhomes, fifth wheels, travel trailers, and even hybrid campers.
Just remember that your main goal is to seal air underneath – that is what makes RV skirting work.
RVing Headquarters Team
RVing Headquarters is operated by long-time RV enthusiasts with over 8 years of RV industry expertise and full-time and part-time RV ownership experience. From motorhomes to trailers and campervans, we've done it all. Our Mission: to inspire, educate, and entertain anyone who is interested in the RV lifestyle.
Recent Posts
Should I Leave My Black Tank Open or Closed? Waste Tank Tips
Full hookup RV parks and campsites are the creme-de-la-creme of campsites, providing all the convenience of a sticks-and-bricks house in nature, with an ever-changing backyard. If you’re on full...
Why Are Campers 5th Wheel and Not Gooseneck Hitches?
Fifth wheel RVs are the largest towable campers with the most amenities and features. As you’re RV shopping or researching, you may be wondering: why are campers 5th wheel and not...

- Find a Location
Winter RV Skirting Best Practices

RV skirting for the winter is a temporary cover placed all around an RV to create an air-resistant seal for the camper’s underbelly. Cold air seeps into a camper when it is allowed to blow underneath it. These gusts enter through any exposed nooks and crannies below the camper.
Properly installed skirts prevent cold air from burrowing into an RV. Some of the most common forms of RV skirting are vinyl covers that snap on , foam boards that owners customize, and inflatable tubes that conform to the shape of your camper .
Why Use RV Skirting for Winter?
RV skirting helps better regulate the temperature in a camper because you won’t be fighting an extra batch of cold air to keep your rig warm. The underside of your camper is one of the most vulnerable places where temperature can be lost.
By skirting your RV, you keep the cold air out and the warm air in, effectively conserving energy by running heaters less. It’ll also protect vital camper components like water pipes from freezing over. When camping in the winter for a sustained period, we highly recommend properly skirting your RV.
At What Temperature Do You Need RV Skirting?

The simple answer to this question: Skirt your RV for any extended time spent camping in below-freezing temps.
The longer answer is that it depends on the RV type. Four-season campers, for example, are designed for freezing temps. They often feature extra insulation and heated underbellies to battle the cold. However, no camper is unaffected!
That’s why the best practice is to always skirt your camper when subjecting it to extended time with temps below 32 degrees Fahrenheit.
How To Install RV Skirting
There are three different ways to put on RV skirting for the winter:
- DIY – With this method, you find the materials yourself (see below for different types of RV skirting materials), take all the measurements along the underbelly of your RV, cut the materials to fit, and then attach the makeshift skirt to the RV’s underside.
- Order a kit – Kits like the EZ snap or AirSkirts come with all the materials needed to self-install.
- Order a custom RV skirt – Some companies tailor-make RV skirts to fit specific campers. They may even offer installation. This is generally the most expensive RV skirting option, but can also be the most effective insulator.
How Much Does RV Skirting Cost?
The costs of skirting vary greatly depending on the size of your rig and the type of skirting you decide to use.
If you DIY your own skirting setup (more on that below), it can cost you between $100-$500+ depending on the type of materials you use and how you source them.
If you use a professionally made RV skirt or have one installed, expect to spend anywhere from $1,000-$5,000 to skirt your RV.
What is the Best RV Skirting for Winter?
The best RV skirting for winter depends on a variety of factors, from rig type to how often a camper gets moved to how low the temps get.
Ready-to-Install RV Skirting Kits

Insulated RV skirting kits are pre-made at a factory and offer customizable options to help get the best fit for a specific RV. While manufacturers work hard to create air-resistant fits, it’s important to research options to ensure a snug fit on your RV.
Here are the main types of RV skirting kits:
- EZ Snap RV Skirting Kit – The EZ Snap Kit comes in a variety of lengths to fit most RVs. The installation process involves placing a series of buttons along the underside of a camper. The skirt then snaps into place and snugs up along the rig. EZ Snap also makes kits for fifth wheel RVs and motorhomes.
- AirSkirts – This relatively new entrant to RV skirting has been making serious waves due to ease of use, effectiveness of seal, and visual appeal. AirSkirts are inflatable tubes customized to your RV’s length. You place the tubes just under a camper and then inflate to create a tight seal between the rig and the ground.
- Fully customized skirts – This is generally the most expensive type of RV skirting for the winter. In this case, a company or RV dealer will take detailed measurements of your rig and create a skirt specifically for you. They may even personally install it.
Homemade RV Skirting

As a general rule, DIY RV winter skirting can be time-consuming and usually doesn’t offer much curb appeal. In fact, many RV parks don’t allow DIY skirting because it can be unsightly. That said, homemade RV skirting can have a time and place in the right situations. Here are the different types of DIY skirts and the dos and don’ts to keep in mind.
Foam Board Insulation
These styrofoam boards are readily available at most hardware stores and are commonly cut to create a custom RV skirt. The skirt is then pieced together and affixed with silver HVAC tape. If you choose this RV winter skirting method, note these do’s and don’ts for proper use and application:
- Do cut the foam boards to fit properly so they create an air-resistant seal.
- Do use HVAC tape to cover the seams and seal the skirt to your RV.
- Do confirm with the campground that you’re allowed to use foam board insulation for this purpose.
- Don’t waste the foam board. You can reuse it year after year as an RV skirt if you have a place to store it.
- Don’t skimp on measuring, re-measuring, and measuring again. One of the biggest frustrations with foam board skirting is proper fit.
- Don’t use this method if you won’t be stationary for most of the winter.
RVers commonly use plywood for DIY winter RV skirting because it is relatively affordable and readily available. Like foam board, it can be difficult to cut to shape, hard to store for reuse, and isn’t allowed at all campgrounds. However, plywood insulates well and can be cost-effective in the short term.
Remember these do’s and don’ts before choosing this method of skirting your RV for winter:
- Do install on stable ground. Plywood will no longer fit if soft ground shifts under the camper.
- Do cut so the boards fit tightly all around the camper.
- Do confirm with the campground that plywood is okay.
- Don’t use plywood for skirting if you don’t have a way to store it for reuse. This will become an expensive and time-consuming option long-run if you have to remake it every winter.
- Don’t make your first cut before you have a plan. Plywood RV skirts need to hug the camper and the ground tightly to be effective. That means you’ll need a blueprint before getting started.
Billboard/Homemade Tarps
Billboard and other heavy-duty tarps are another popular material for DIY RV skirting. This can be a budget-friendly option if you are skilled at making cuts that’ll fit the different shapes, nooks, and corners of your camper. The goal is to create a custom skirt that looks something like this EZ Snap RV Skirt.
Here are a few do’s and don’ts if you decide to use this winter RV skirting method.
- Do carefully consider the time this option might take relative to buying a pre-made skirt.
- Do take care to make the skirt visually appealing so RV park managers don’t get angry.
- Don’t leave gaps. Air leakage is the enemy of proper RV skirting.
- Don’t be afraid to reconsider. Tarps are usually inexpensive. If you get started and realize you’ve bit off more than you can chew, it’s okay to change course.
Types of RV Skirting to Avoid
While there are many options out there for RV skirting, a few should be completely avoided.
Stacking hay bales along the underside of a camper is, unfortunately, a common form of winter RV skirting. While it is an effective insulator, hay can attract pesky critters like mice, bugs, and rats. More importantly, hay can also easily catch fire when dry and is prone to rotting when wet. That’s why it’s best to steer clear.
Believe it or not, some folks pile snow around their RV to create an underbelly seal. This is an unreliable option because you might not get enough snow, Mother Nature might thaw it too soon, or the heat you create under your RV could melt the snow.
What is the Best Way to Insulate RV Skirting?
Any of the DIY or kit options we recommend above will provide some of the best ways to insulate your RV. In extreme cold, a combination of foam board insulation and something like the EZ Snap Kit provides maximum insulation and is visually appealing.
Other Winter RV Skirting Dos and Don’ts

These are some other general dos and don’t to bear in mind for winter skirting.
Dos for RV Winter Skirting
Install the RV skirt before winter sets in. A common mistake is waiting too long to skirt an RV for the winter, resulting in frozen pipes and cold inhabitants.
Choose a skirting method that matches your skill level. Because nothing is worse than getting knee-deep into a job to realize it would’ve been better to order from (or hire) the pros.
Consider aesthetics. Your neighbors will thank you for a skirted RV that looks nice.
Ground the skirt. Insulated RV skirting can only insulate if it’s weighed down and sealed to the ground.
Don’ts for RV Winter Skirting
Don’t work with unqualified professionals. If you choose to hire someone to make and install a custom RV skirt, check their credentials, samples of previous work, and references to ensure you’re dealing with a seasoned pro.
Don’t leave gaps. Cold air is the enemy of RV skirting. Make sure it stays out.
Father Winter may have settled in, but RVers have options for keeping him at bay. RV skirting is one of the most dependable ways to help keep a camper warm for the winter. If you plan to park your RV in a cold site for an extended period of time, skirting is a must.
Have you considered skirting your RV in the past? What methods did you try, and were you successful? Let us know in the comments below.
Leave Your Comment Cancel Reply
Save my name, email, and website in this browser for the next time I comment.
Shop By RV Type

Your Adventure Awaits
Copyright © 2023 cwi, llc all rights reserved.
- RV Glossary |
- Privacy Policy |
- California Privacy Rights |
- Do Not Sell or Share My Personal Information |
- Targeted Advertising Opt Out |
- Terms of Use